
















Postać z Genshin Impact

Mitya (Genshin Impact)

Poradnik, build i umiejętności po polsku

  • 5 gwiazdek
  • Element Electro
  • Broń Catalyst
  • Dane gry 7.2.0

Obrażenia reakcji Stellar-Conduct

Mitya z Genshin Impact z polskim napisem Kaption
Polskie napisy do dialogów z Genshin Impact działają już dziś.

W skrócie

Mitya to postać Electro używająca broni typu Catalyst. Zamienia reakcje Superconduct drużyny w Stellar-Conduct. Tworzy Gradient Beacons, wzmacnia Stellar-Conduct przez Elemental Mastery i zużywa Beacony specjalnym Charged Attack.

W stanie Steady State jego Detection Core daje drużynie Elemental Mastery. Z kolei stan Overloaded pozwala zdobywać więcej Beaconów po reakcjach Stellar-Conduct. Dobierz mu postać Cryo, żeby korzystać z tej reakcji, i zostaw mu czas na polu, gdy chcesz zużyć Beacony.

Build

Z danych gry

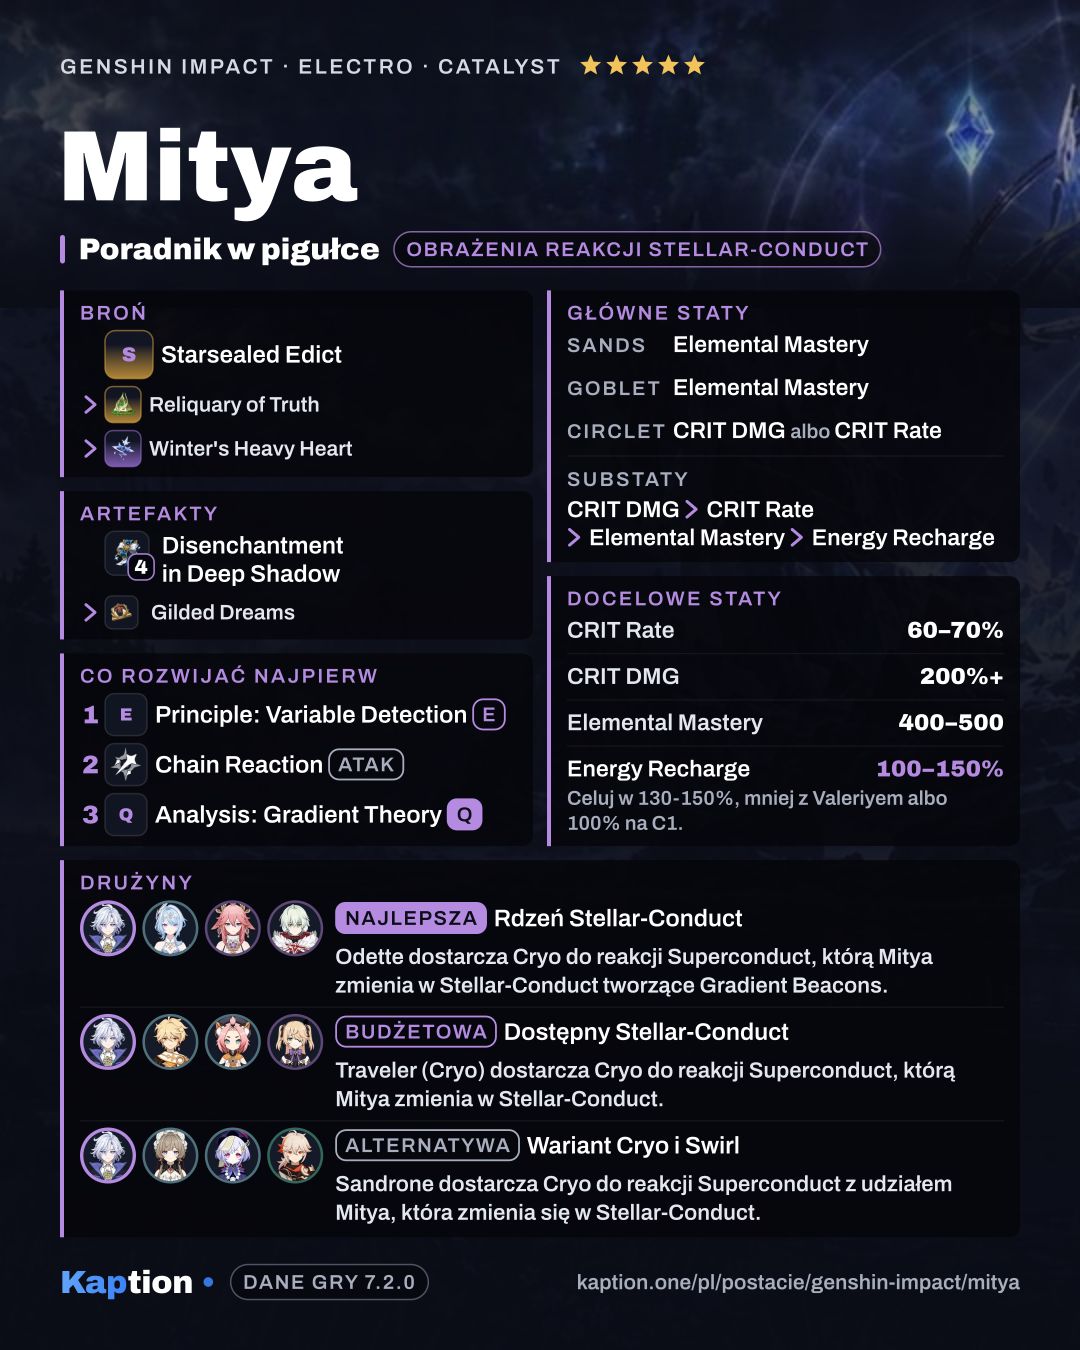
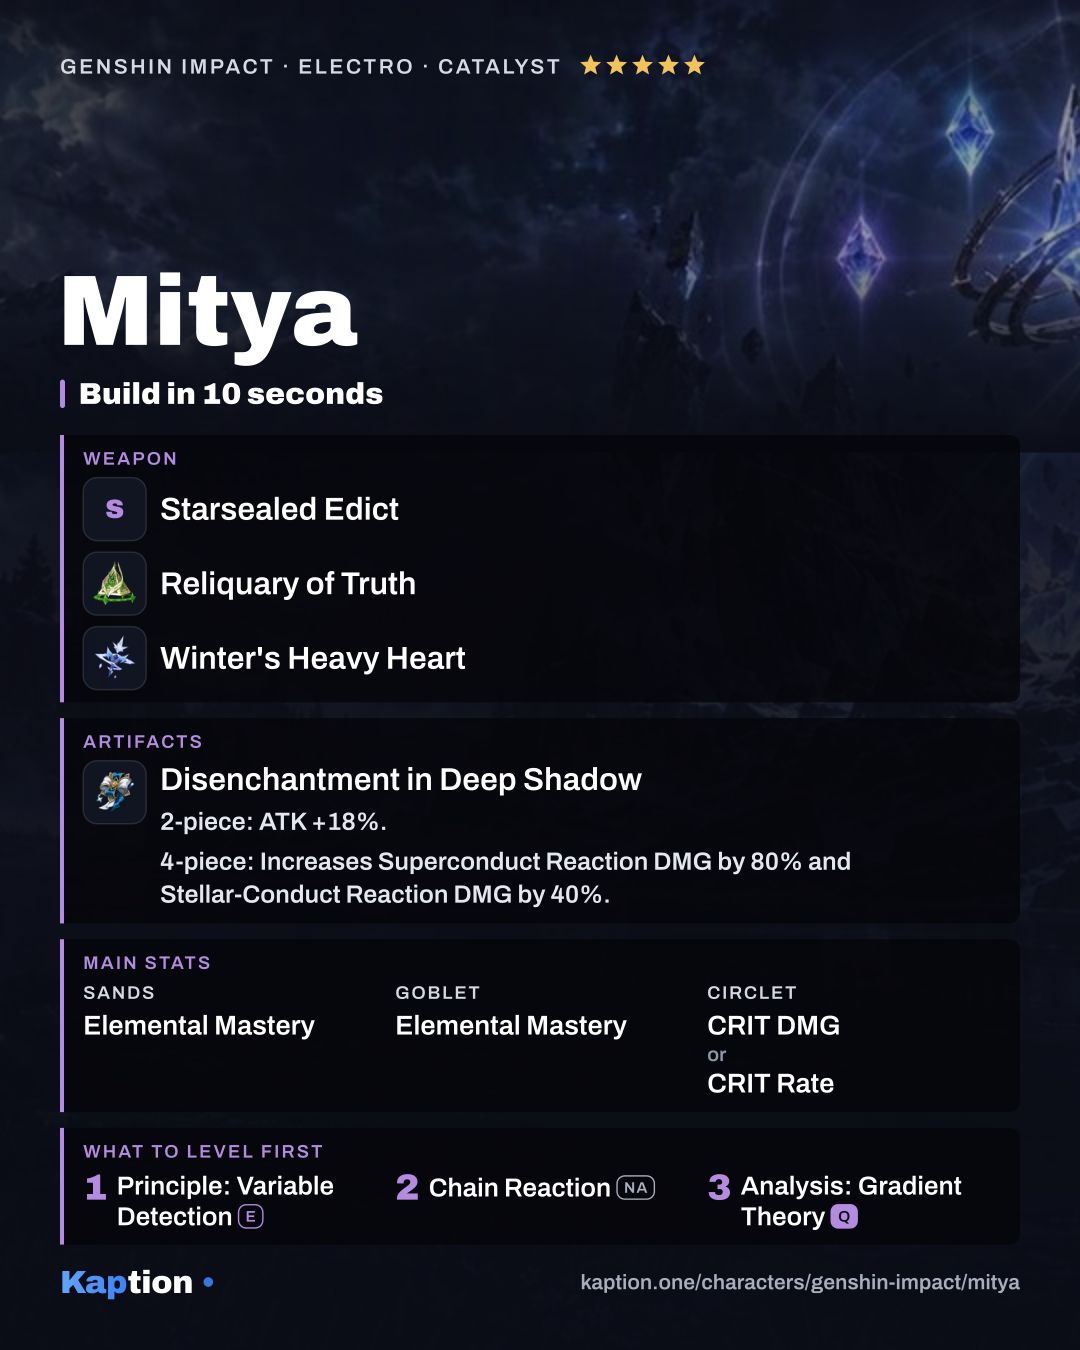
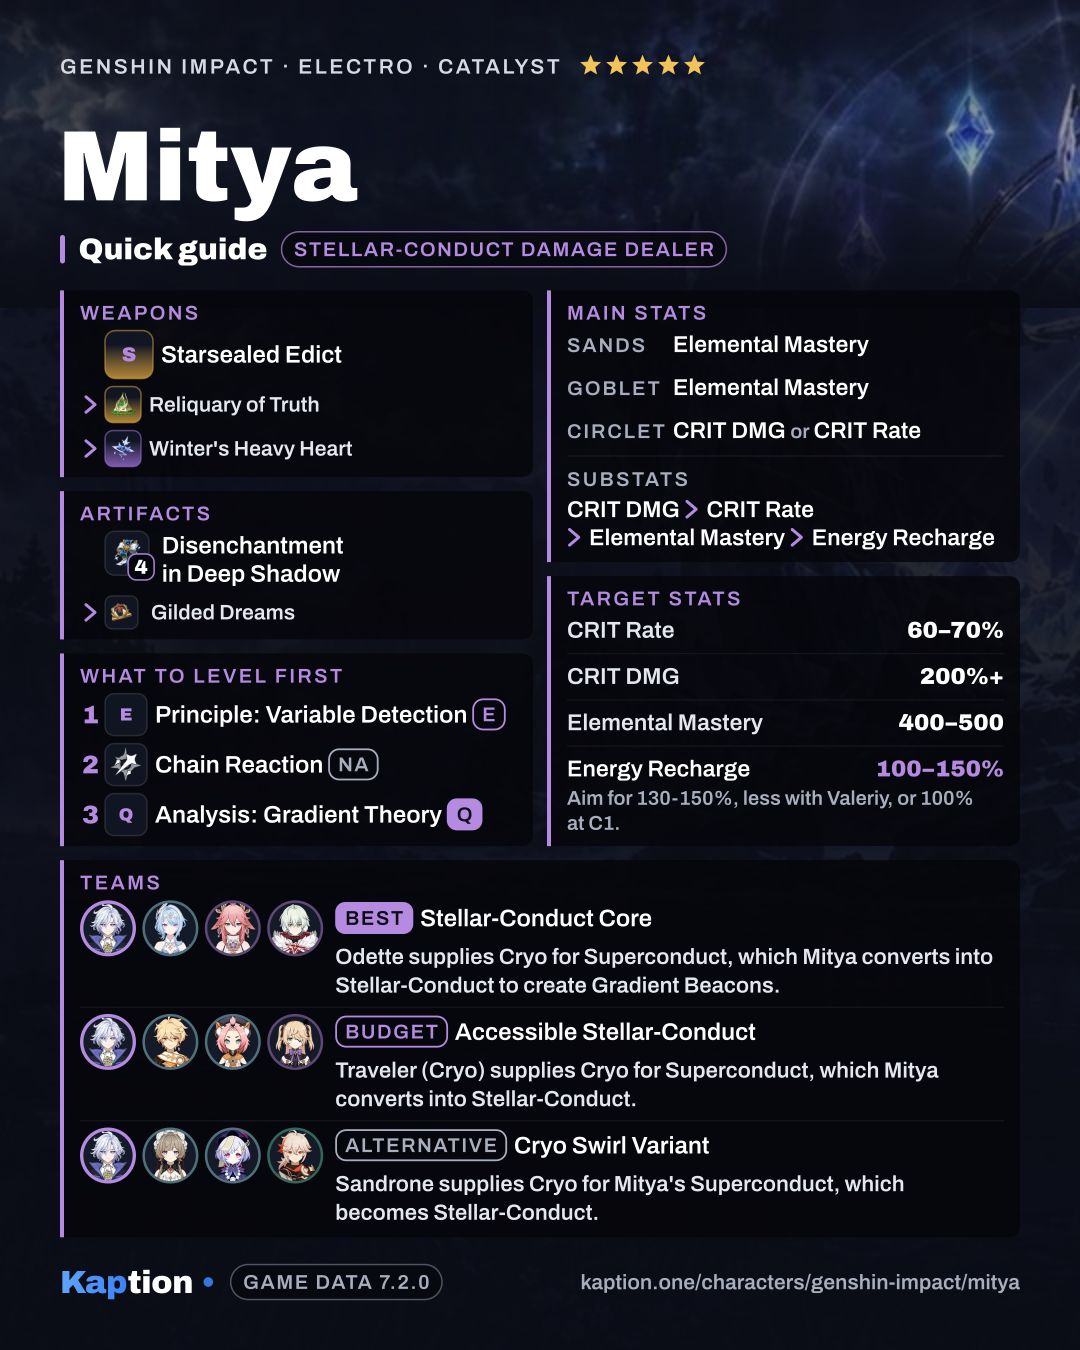
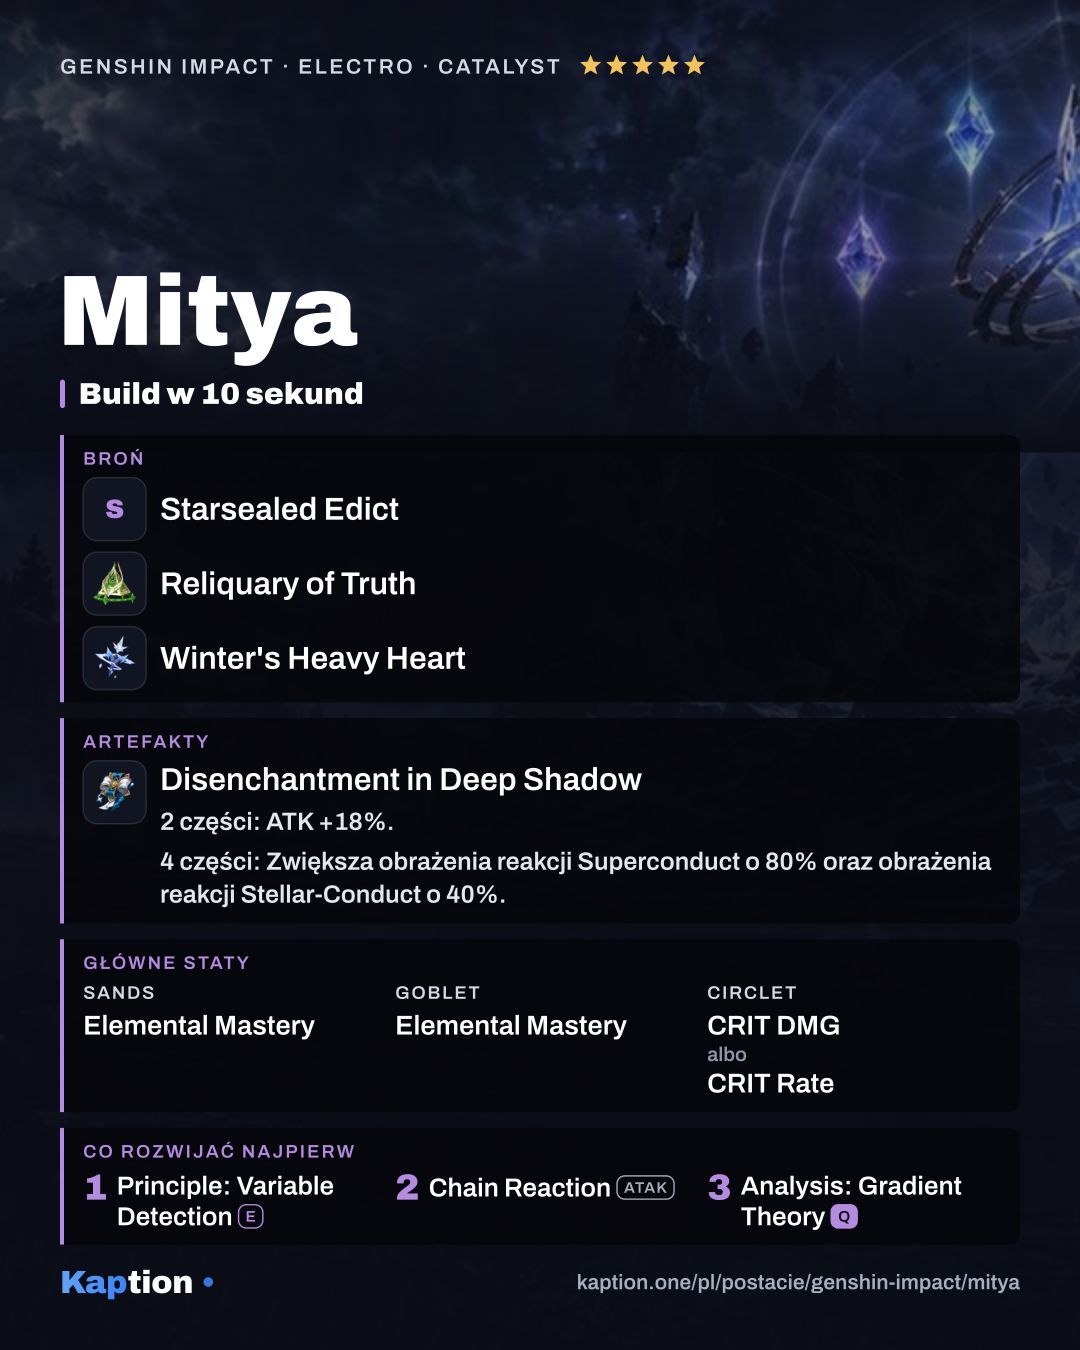
4× Disenchantment in Deep Shadow · Sands Elemental Mastery · Goblet Elemental Mastery · Circlet CRIT DMG lub CRIT Rate · substaty CRIT DMG > CRIT Rate > Elemental Mastery > Energy Recharge

Artefakty

4 elementy · Zestaw artefaktów

Wybierz jeden. Gra podaje je w tej kolejności.

  1. Disenchantment in Deep Shadow
    Disenchantment in Deep Shadow
    • Premia za 2 elementy: ATK +18%.
    Pokaż efekt
    • Premia za 4 elementy: Zwiększa obrażenia reakcji Superconduct o 80% oraz obrażenia reakcji Stellar-Conduct o 40%. Gdy dzierżący broń atakuje przeciwników objętych reakcją Superconduct lub Stellar-Conduct, współczynnik CRIT tego ataku zostaje zwiększony o 16%.
  2. Gilded Dreams
    Gilded Dreams
    • Premia za 2 elementy: Zwiększa Mistrzostwo Elementalne o 80.
    Pokaż efekt
    • Premia za 4 elementy: W ciągu 8s od wywołania Elemental Reaction, postać wyposażająca ten przedmiot otrzyma bonusy zależne od Elemental Type pozostałych członków drużyny. ATK zwiększa się o 14% za każdego członka drużyny, którego Elemental Type jest taki sam jak wyposażonej postaci, a Elemental Mastery zwiększa się o 50 za każdego członka z innym Elemental Type. Każdy z wymienionych bonusów liczony jest do 3 postaci. Efekt ten można wywołać raz na 8s. Postać wyposażająca może wywołać jego efekty także poza polem.

Zamienniki

Gdy nie masz zestawu wyżej.

  • Tenacity of the Millelith
    Tenacity of the Millelith Pokaż efekt
    • Premia za 2 elementy: HP +20%
    • Premia za 4 elementy: Kiedy Umiejętność Żywiołowa trafia przeciwnika, ATK wszystkich pobliskich członków drużyny zwiększa się o 20%, a ich Wytrzymałość Tarczy zwiększa się o 30% na 3s. Efekt ten może być wyzwolony co 0,5s. Efekt ten może być wywołany nawet gdy postać używająca tego zestawu artefaktów nie jest na polu.

Główne statystyki

Sands
Elemental Mastery
Goblet
Elemental Mastery
Circlet
CRIT DMG lub CRIT Rate

Substaty

  1. CRIT DMG
  2. CRIT Rate
  3. Elemental Mastery
  4. Energy Recharge

Statystyki docelowe

Łączne wartości, do których warto dobić na ekranie statystyk postaci.

StatystykaCel
CRIT Rate 60–70%
CRIT DMG 200%+
Elemental Mastery 400–500
Energy Recharge 100–150% Celuj w 130-150%, mniej z Valeriyem albo 100% na C1.

Polecana broń

Gra nie podaje broni dla tej postaci.

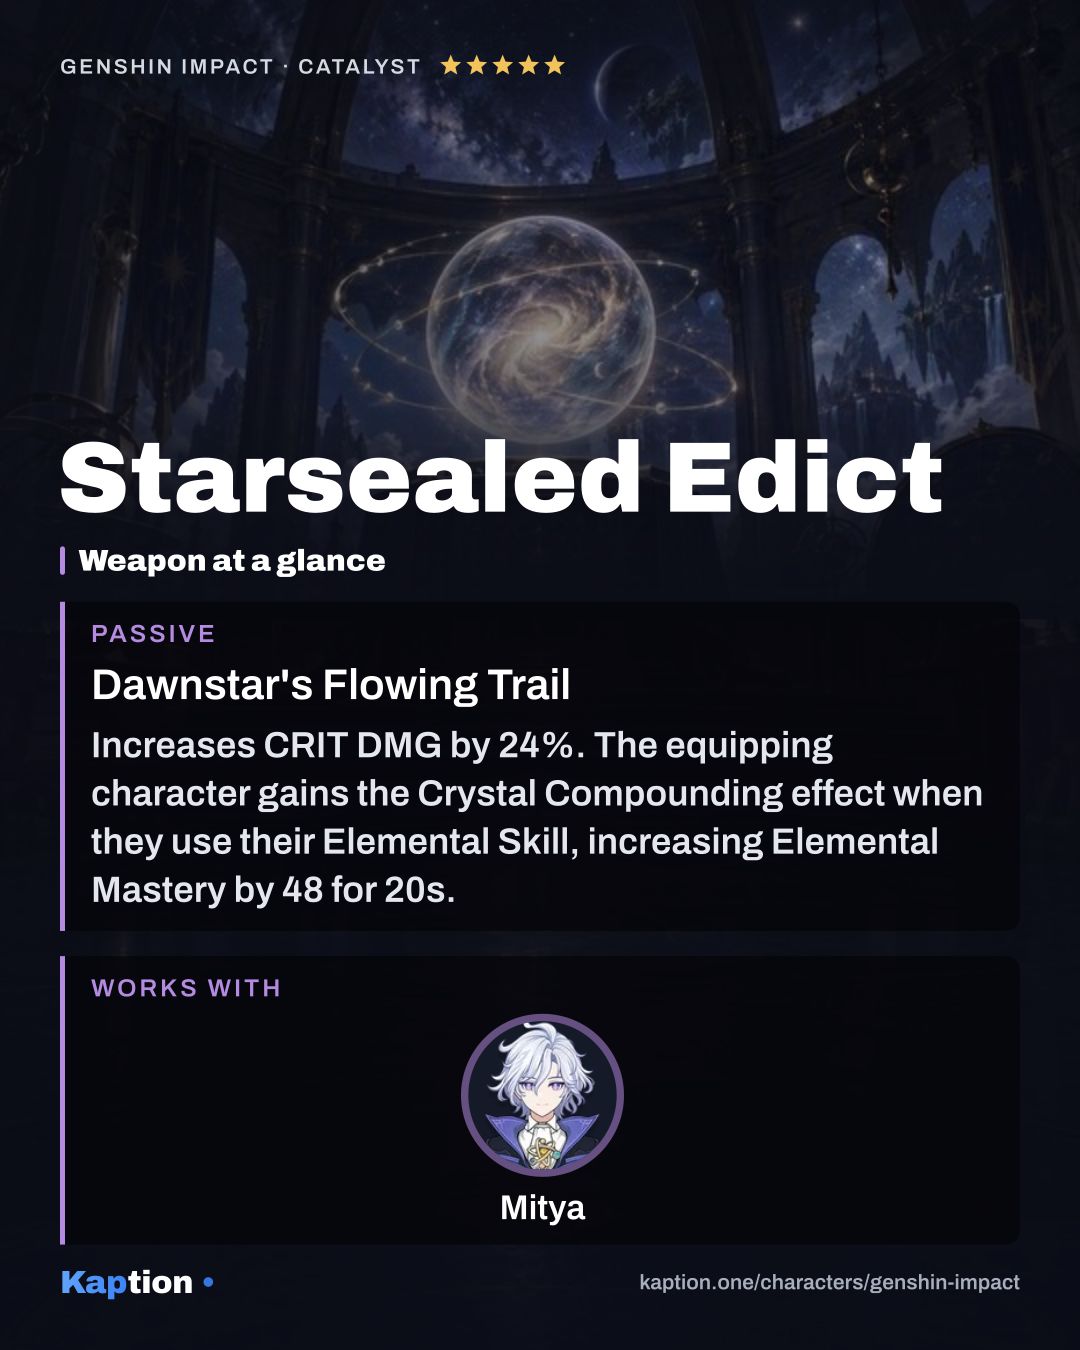
  1. Starsealed Edict 5 gwiazdek
    Dawnstar's Flowing Trail Pokaż efekt

    Increases CRIT DMG by 24%. The equipping character gains the Crystal Compounding effect when they use their Elemental Skill, increasing Elemental Mastery by 48 for 20s. During this time, the equipping character gains a Law of Combustion stack when a nearby party member triggers an Elemental Reaction. Each stack increases Elemental Mastery by an additional 24. Max 3 stacks. These stacks last until Crystal Compounding ends or the equipping character uses their Elemental Skill again. Radiance: Stellar-Conduct: Each Law of Combustion stack also increases the equipping character's Stellar-Conduct CRIT DMG by 12%. These effects can be triggered even when the equipping character is off-field.

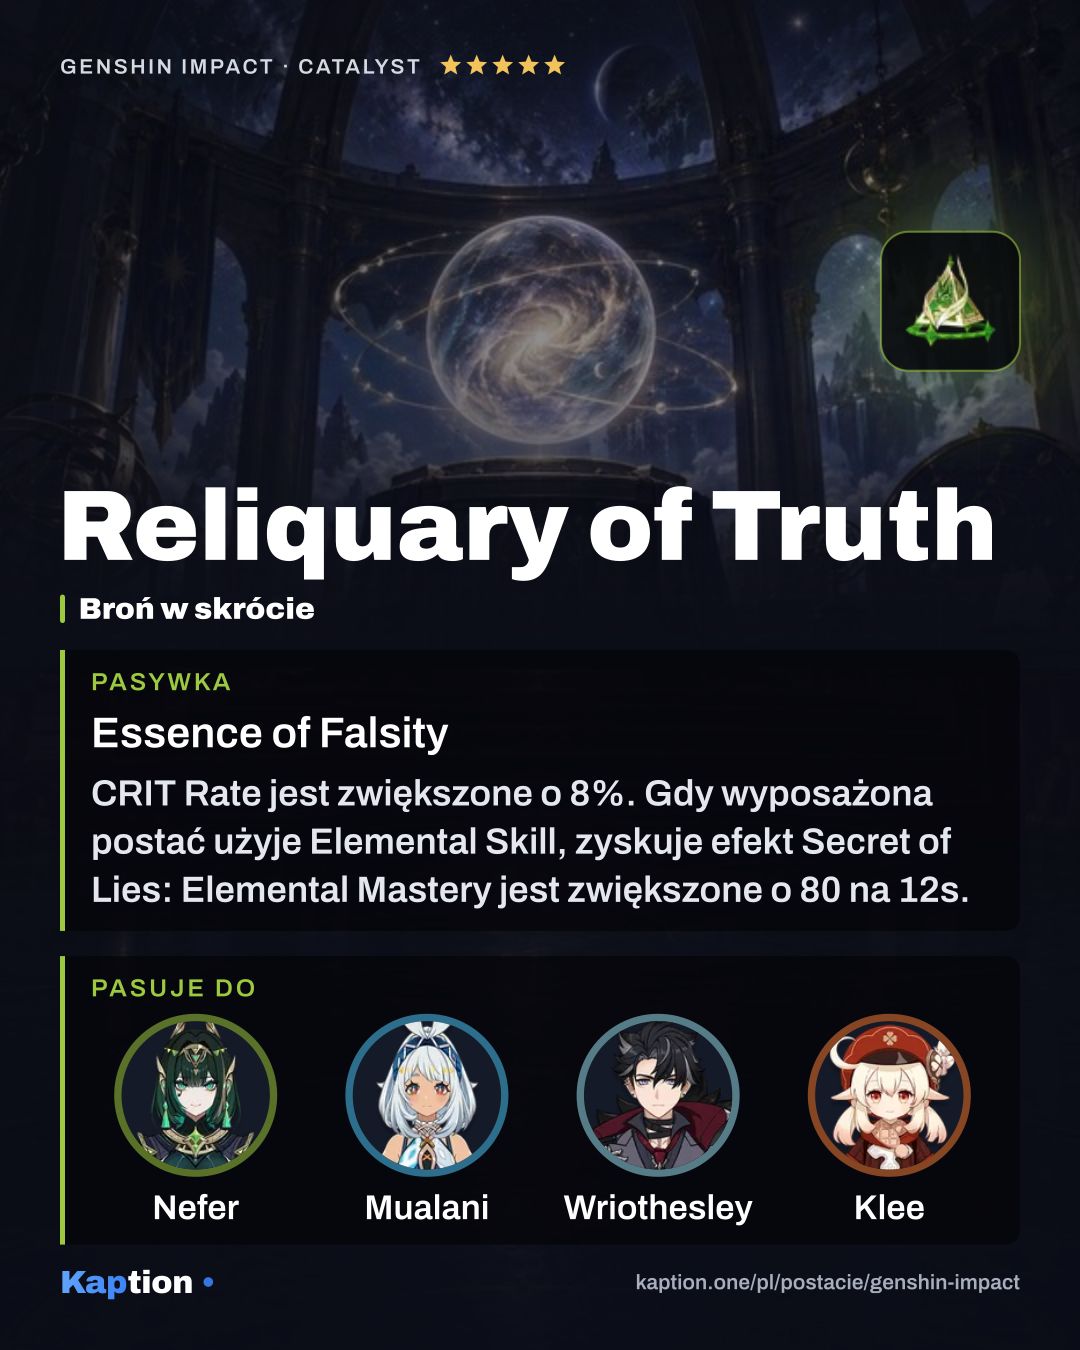
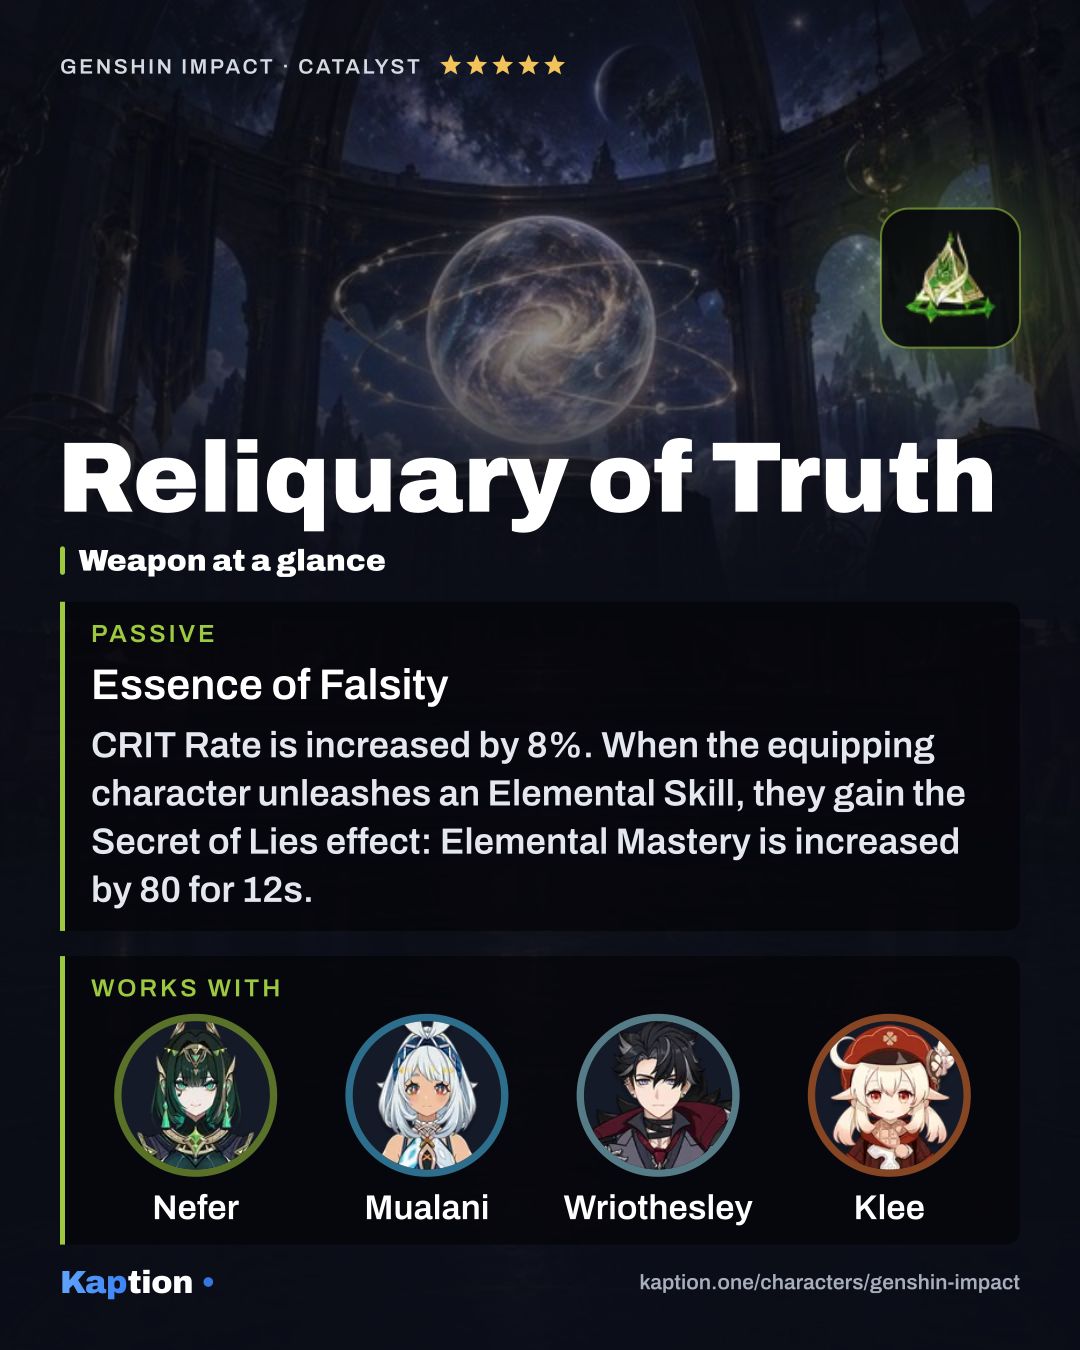
  2. Reliquary of Truth
    Reliquary of Truth 5 gwiazdek
    Essence of Falsity Pokaż efekt

    CRIT Rate jest zwiększone o 8%. Gdy wyposażona postać użyje Elemental Skill, zyskuje efekt Secret of Lies: Elemental Mastery jest zwiększone o 80 na 12s. Gdy wyposażona postać zada Lunar-Bloom DMG przeciwnikowi, zyskuje efekt Moon of Truth: CRIT DMG jest zwiększone o 24% na 4s. Gdy zarówno Secret of Lies jak i Moon of Truth są aktywne jednocześnie, efekty obu będą zwiększone o 50%.

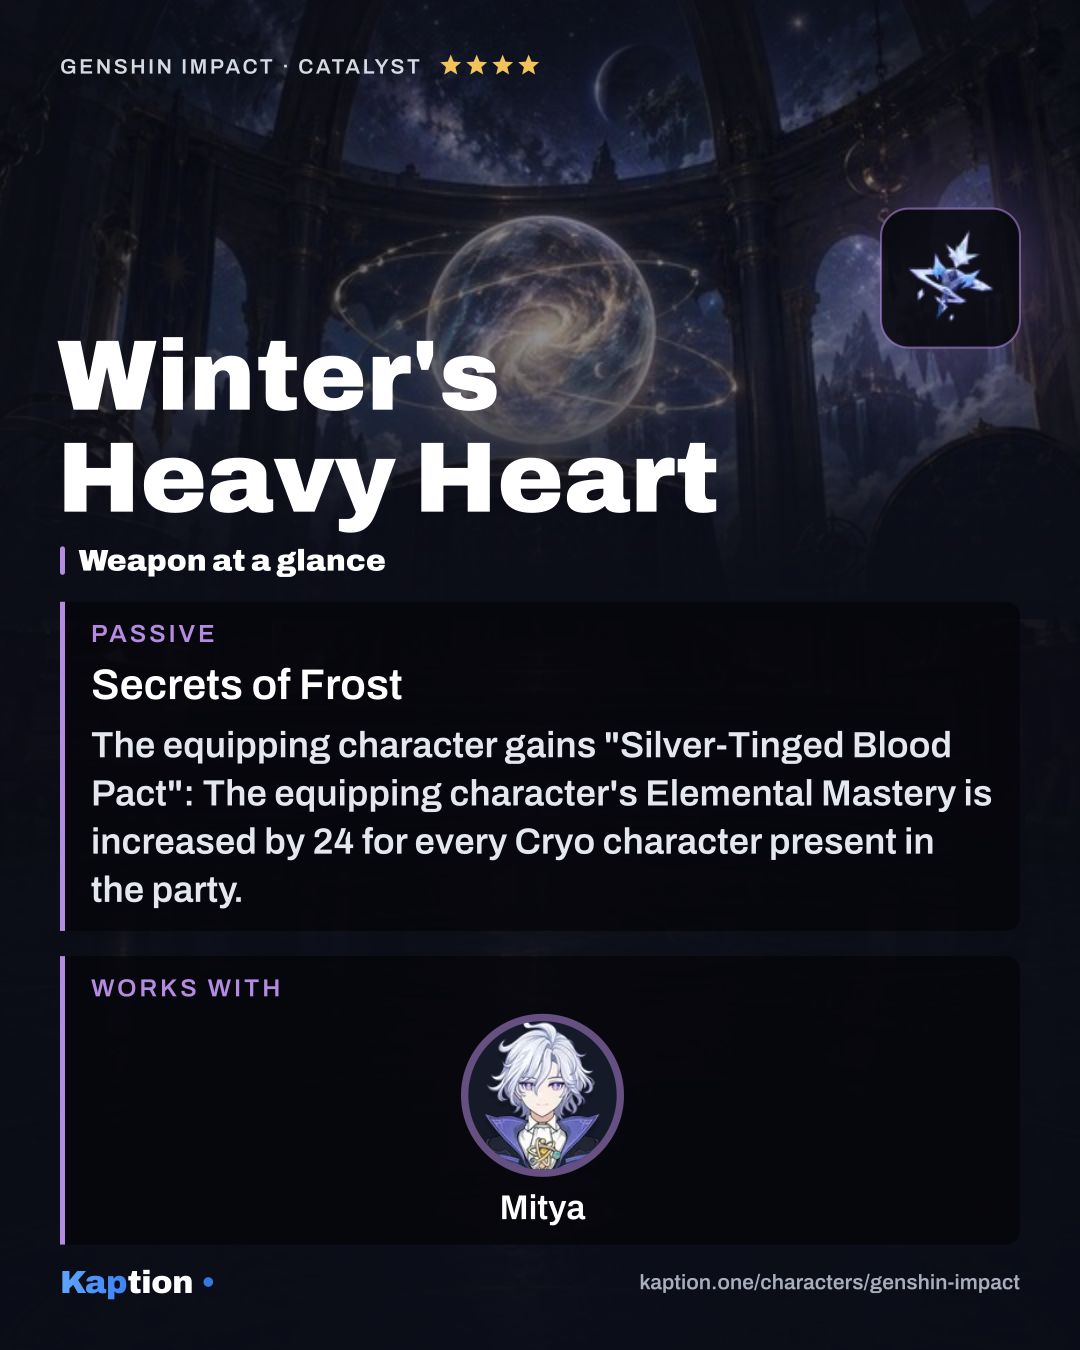
  3. Winter's Heavy Heart
    Winter's Heavy Heart 4 gwiazdki
    Secrets of Frost Pokaż efekt

    The equipping character gains "Silver-Tinged Blood Pact": The equipping character's Elemental Mastery is increased by 24 for every Cryo character present in the party. For every Electro character present in the party, the equipping character's ATK is increased by 4.8%. Up to 4 Cryo or Electro characters can provide the above buffs. Radiance: Stellar Glimmer: The effect of Silver-Tinged Blood Pact is changed to: For every Cryo or Electro character present in the party, the equipping character gains a 20-point Elemental Mastery boost and deals 6% increased Stellar Glimmer reaction DMG.

Masz tę postać? Zrób kartę swojego buildu z UID Statystyki, artefakty, broń i talenty z Twojej wizytówki w grze, jako PNG w kilkunastu układach.

Drużyny

Pokaż więcej drużyn (4)Pokaż mniej

Gra też w drużynach

Drużyny innych postaci, w których Mitya ma swoje miejsce.

  • Superconduct

    Valeriy

    • Valeriy
    • Mitya
    • Odette
    • Sucrose

    Obrażenia Electro na polu

  • Overloaded

    Chevreuse

    • Chevreuse
    • Mitya
    • Mavuika
    • Fischl

    Obrażenia Electro i Overloaded

  • Overloaded

    Amber

    • Amber
    • Mitya
    • Fischl
    • Chevreuse

    Obrażenia Electro w Overloaded

Umiejętności

Nazwy po angielsku, jak w grze · podkreślone otwierają kartę · Priorytet = kolejność rozwijania

  1. Atak podstawowy

    Chain ReactionAtak

    Priorytet rozwijania 2 z 3

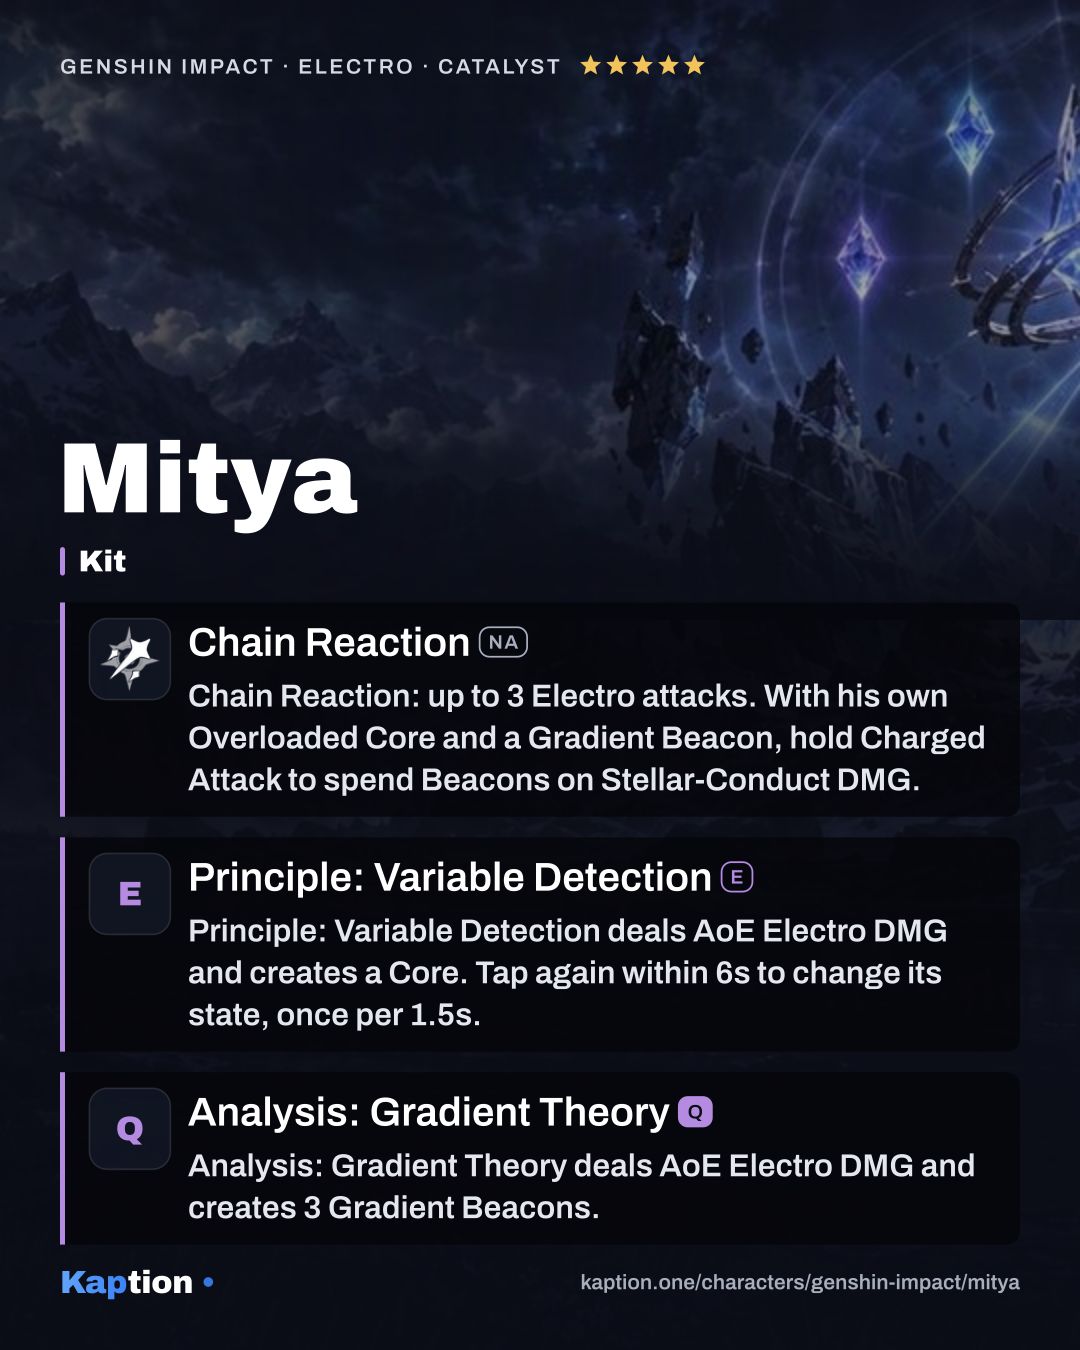
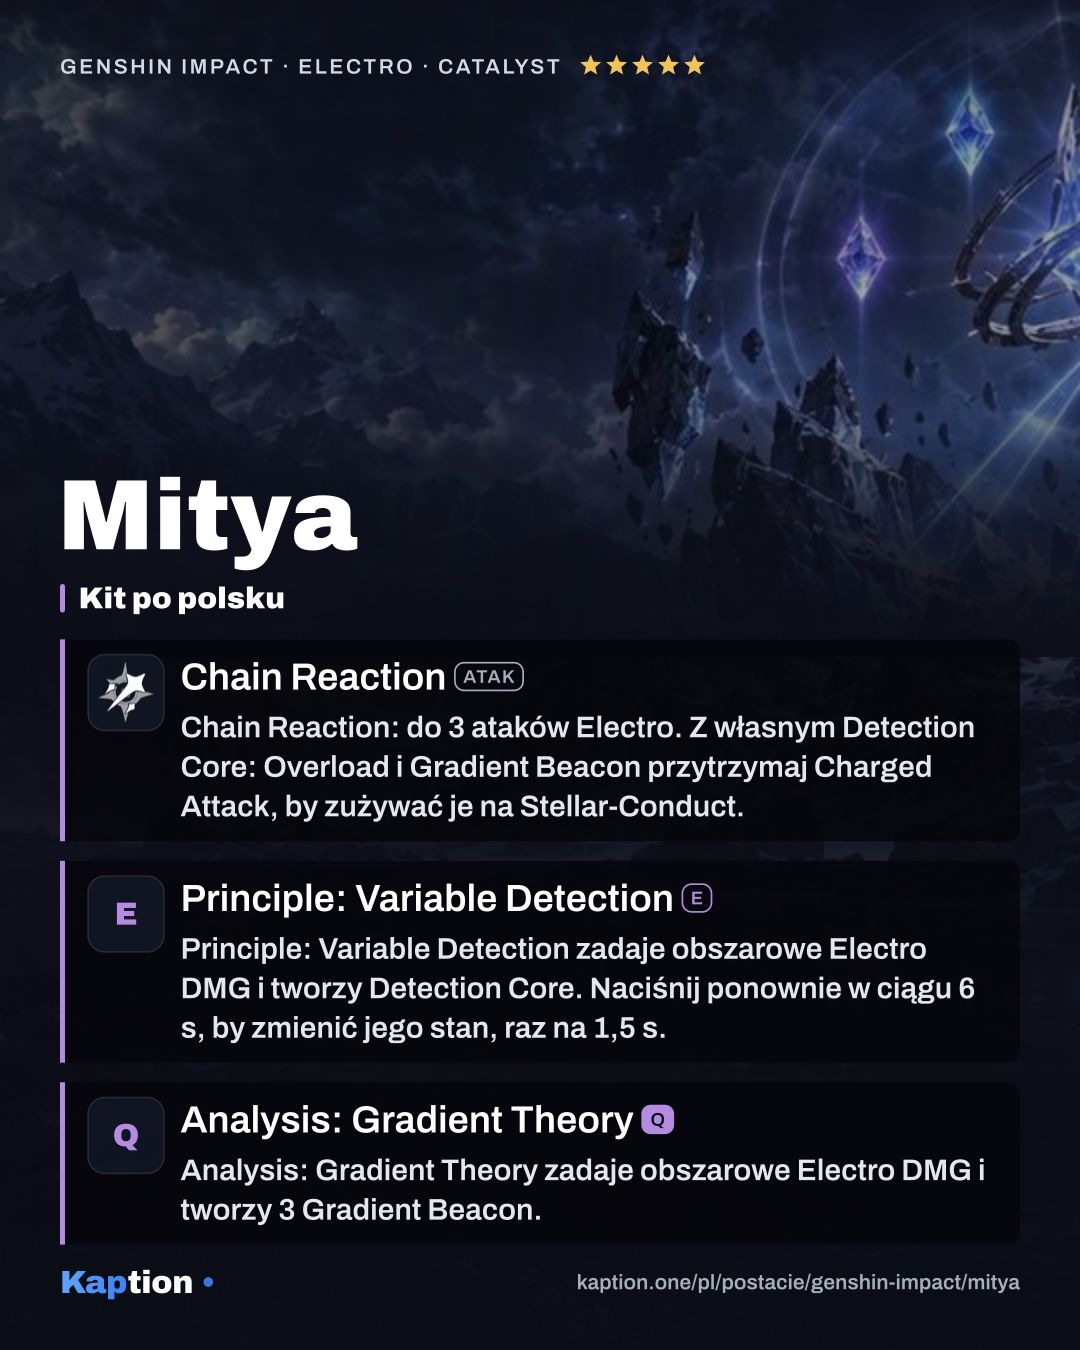
    Chain Reaction (NA): do 3 ataków Electro. Z własnym Detection Core: Overload i Gradient Beacon przytrzymaj Charged Attack, by zużywać je na Stellar-Conduct.

    Normal Attack Performs a maximum of 3 attacks that deal Electro DMG. Charged Attack Consumes a certain amount of Stamina to deal AoE Electro DMG to the area in front after a short casting time. Mitya will instead perform the special Charged Attack Gradient Detonation, which consumes no Stamina, if a Detection Core: Overload created by Mitya himself is currently on the field and he has at least 1 Gradient Beacon: Deals 1 instance of AoE Electro DMG to the area in front and continuously consumes Gradient Beacons while held. Each Gradient Beacon consumed deals 1 instance of AoE Electro DMG to the area in front that is considered Stellar-Conduct reaction DMG. Plunging Attack Plunges from mid-air to strike the ground below, damaging opponents along the path and dealing AoE Electro DMG upon impact.

  2. Umiejętność

    Principle: Variable DetectionE

    Priorytet rozwijania 1 z 3

    Principle: Variable Detection (E) zadaje obszarowe Electro DMG i tworzy Detection Core. Naciśnij ponownie w ciągu 6 s, by zmienić jego stan, raz na 1,5 s.

    Conducts a theoretically relatively safe experiment at a theoretically relatively safe yield, dealing AoE Electro DMG and creating a Detection Core in different ways depending on whether the Skill is tapped or held. Tapping the Elemental Skill Principle: Variable Detection again within 6s after using it changes the Detection Core's state. The Detection Core's state can be changed in this way every 1.5s.

  3. Ultimate

    Analysis: Gradient TheoryQ

    Priorytet rozwijania 3 z 3

    Analysis: Gradient Theory (Q) zadaje obszarowe Electro DMG i tworzy 3 Gradient Beacon.

    Let the elements burst forth like inspiration itself! Deals AoE Electro DMG and creates 3 Gradient Beacons.

Pasywki

  1. Pasywna

    Baseline Stress TestPasywka

    Steady State: pobliska drużyna ma 30 Elemental Mastery za każdy Gradient Beacon. Overloaded: po Stellar-Conduct 1 Gradient Beacon co 1,5 s przez 6 s.

    The Detection Core created by the Elemental Skill Principle: Variable Detection is enhanced. Depending on the state of the Detection Core created: ·Steady State: All nearby party members gain 30 Elemental Mastery for each Gradient Beacon Mitya has; ·Overloaded: After nearby party members trigger Stellar-Conduct reactions, instead obtain 1 Gradient Beacon every 1.5s for 6s.

  2. Pasywna

    Explosive Reagent: Safe Limits ExceededPasywka

    Gradient Beacon trwają 10 s. Ich tworzenie daje Mitya 5% CRIT Rate na 15 s, maksymalnie 4 razy.

    The duration of Gradient Beacons is increased to 10s. Additionally, Mitya's CRIT Rate increases by 5% for 15s after creating a Gradient Beacon. This effect can stack up to 4 times.

  3. Pasywna

    Stellar Jubilee: Top-Secret ProtocolPasywka

    Superconduct zmienia się w Stellar-Conduct i tworzy Gradient Beacon. Elemental Mastery postaci Mitya zwiększa bazowe obrażenia reakcji maksymalnie o 14%.

    When party members trigger Superconduct, it will be changed to Stellar-Conduct. Stellar-Conduct reactions will no longer create Starlight Prisms, and will instead create 1 Gradient Beacon nearby every 1.5s for 3s. These Beacons can be carried by Mitya and transform the area around them into an even larger Polestar Field. Triggering another Stellar-Conduct reaction will refresh the duration of the aforementioned effects. Additionally, the Base Stellar-Conduct DMG dealt by all nearby party members will be increased based on Mitya's Elemental Mastery: Every point of Elemental Mastery he has increases Base Stellar-Conduct DMG by 0.028%. The maximum Base DMG increase that can be gained this way is 14%. While within a Polestar Field, Mitya will also enter the Radiance: Stellar-Conduct state.

  4. Pasywna

    Energy CatalysisPasywka

    Detection Core: Steady State szybko niszczy skały. Z postacią Mitya w drużynie Prime Ice Construct: Basic Heat Source nie zużywa Kresnik Energy.

    When destructible rocks are nearby, Detection Core: Steady State can quickly clear them. Additionally, when Mitya is in the party, creating Prime Ice Construct: Basic Heat Source does not consume Kresnik Energy.

Konstelacje

  1. C1

    The Observer Seeking What Is Missing

    Warto

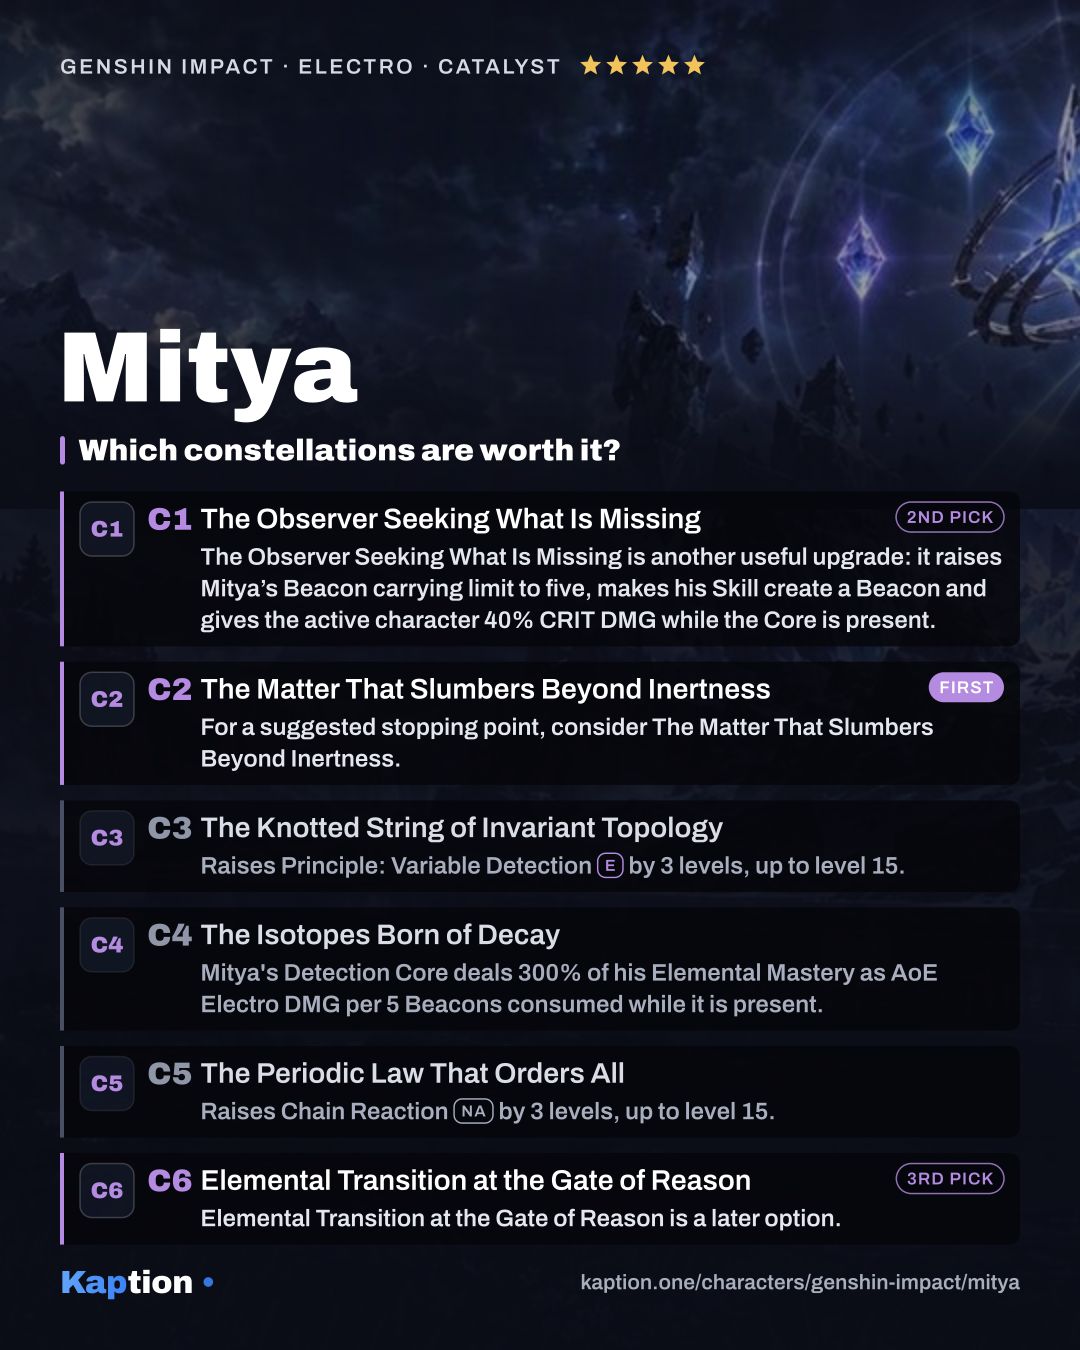
    The Observer Seeking What Is Missing (C1) też jest przydatne.

    The maximum number of Gradient Beacons Mitya can carry is increased to 5. Using the Elemental Skill Principle: Variable Detection additionally creates 1 Gradient Beacon. While the Detection Core is present, your own active character's CRIT DMG is increased by 40%. Additionally, Mitya regenerates 10 Elemental Energy when a Gradient Beacon is created. This effect can be triggered once every 8s.

  2. C2

    The Matter That Slumbers Beyond Inertness

    Warto

    Jako sugerowany punkt, na którym możesz skończyć, rozważ The Matter That Slumbers Beyond Inertness (C2).

    While the Detection Core is present, all opponents within the Polestar Field have their Cryo RES and Electro RES decreased by 20%. Additionally, if the Detection Core created is: ·Steady State: All nearby party members gain 123 Elemental Mastery; ·Overloaded: Your own active character gains 234 Elemental Mastery.

  3. C3

    The Knotted String of Invariant Topology

    Increases the Level of the Elemental Skill Principle: Variable Detection by 3. Maximum upgrade level is 15.

  4. C4

    The Isotopes Born of Decay

    Detection Cores created by Mitya himself deals 1 instance of AoE Electro DMG equal to 300% of Mitya's Elemental Mastery to nearby opponents for every 5 Gradient Beacons consumed while it is on the field. This DMG is considered Stellar-Conduct reaction DMG.

  5. C5

    The Periodic Law That Orders All

    Increases the Level of Normal Attack: Chain Reaction by 3. Maximum upgrade level is 15.

  6. C6

    Elemental Transition at the Gate of Reason

    Warto

    Później możesz rozważyć Elemental Transition at the Gate of Reason (C6).

    Detection Core is enhanced. If the Detection Core: · Is in the Steady State: Detection Core deals 115% of its original DMG. · Is Overloaded: There is a 34% chance to create 1 new Gradient Beacon whenever Mitya consumes a Gradient Beacon with the Detection Core. Additionally, Stellar-Conduct reaction DMG dealt by all nearby party members is Elevated by 20%.

Materiały

Awans, do maksymalnego poziomu

  • Mora Mora × 420 000
  • Kristallfold Kristallfold × 168
  • Vajrada Amethyst Sliver Vajrada Amethyst Sliver × 1
  • Vajrada Amethyst Fragment Vajrada Amethyst Fragment × 9
  • Vajrada Amethyst Chunk Vajrada Amethyst Chunk × 9
  • Vajrada Amethyst Gemstone Vajrada Amethyst Gemstone × 6
  • Chimeric Core Chimeric Core × 18
  • Symbiotic Chimeric Nucleus Symbiotic Chimeric Nucleus × 30
  • Prime Chimeric Nexus Prime Chimeric Nexus × 36
  • Shattered Stability Anchor Shattered Stability Anchor × 46

Wszystkie umiejętności na maksa

  • Mora Mora × 4 957 500
  • Crown of Insight Crown of Insight × 3
  • Teachings of Charity Teachings of Charity × 9
  • Guide to Charity Guide to Charity × 63
  • Philosophies of Charity Philosophies of Charity × 114
  • Chimeric Core Chimeric Core × 18
  • Symbiotic Chimeric Nucleus Symbiotic Chimeric Nucleus × 66
  • Prime Chimeric Nexus Prime Chimeric Nexus × 93
  • Mask of the Virtuous Doctor Mask of the Virtuous Doctor × 18

Poradnik

Jak działają umiejętności

Zacznij od Principle: Variable Detection, żeby zadać obszarowe obrażenia Electro i stworzyć Detection Core. Krótkie i długie użycie tworzą go na różne sposoby. Przez 6 sekund po użyciu możesz ponownie nacisnąć umiejętność, by zmienić stan Core. Między zmianami musi minąć 1,5 sekundy.

W stanie Steady State pasywka Baseline Stress Test daje pobliskim członkom drużyny 30 Elemental Mastery za każdy Gradient Beacon posiadany przez Mityę. W stanie Overloaded reakcja Stellar-Conduct pobliskiego członka drużyny sprawia, że Mitya otrzymuje jeden Beacon co 1,5 sekundy przez 6 sekund. Wybierz stan zależnie od tego, czy potrzebujesz wzmocnienia, czy Beaconów.

Stellar Jubilee: Top-Secret Protocol zamienia drużynowe Superconduct w Stellar-Conduct. Zamiast Starlight Prisms reakcja tworzy w pobliżu jeden Beacon co 1,5 sekundy przez 3 sekundy. Mitya może je przenosić, a wokół nich powiększa się Polestar Field. Kolejna reakcja odnawia czas tych efektów. Każdy punkt jego Elemental Mastery zwiększa też Base Stellar-Conduct DMG pobliskiej drużyny o 0,028%, maksymalnie o 14%.

Użyj Analysis: Gradient Theory, żeby zadać obszarowe obrażenia Electro i stworzyć trzy Beacony. Gdy na polu jest własny Core Mityi w stanie Overloaded, a on ma przynajmniej jeden Beacon, przytrzymanie Charged Attack z Chain Reaction (NA) uruchamia Gradient Detonation. Ten atak nie zużywa Stamina, zadaje jeden obszarowy cios Electro i podczas przytrzymania zużywa Beacony. Każdy daje kolejny obszarowy cios liczony jako obrażenia Stellar-Conduct.

Explosive Reagent: Safe Limits Exceeded wydłuża czas trwania Beaconów do 10 sekund. Stworzenie Beacona daje też Mityi 5% CRIT Rate na 15 sekund, do czterech kumulacji. Uwzględnij je, gdy dobierasz CRIT Rate z ekwipunku.

Build i dlaczego taki

Zacznij od czterech części zestawu Gilded Dreams. Dwie dają 80 Elemental Mastery, a cztery po wywołaniu reakcji żywiołów zwiększają ATK za członków drużyny tego samego żywiołu co Mitya i Elemental Mastery za postacie innych żywiołów. Ta druga statystyka wzmacnia jego drużynowy bonus do Stellar-Conduct.

Jeśli chcesz skupić się na wsparciu drużyny, rozważ cztery części zestawu Tenacity of the Millelith. Trafienie Elemental Skill daje pobliskim członkom drużyny 20% ATK i 30% Shield Strength na 3 sekundy. Gra podaje też zestaw Disenchantment in Deep Shadow. Cztery części zwiększają obrażenia Stellar-Conduct o 40%, a ataki przeciw przeciwnikom pod wpływem tej reakcji dostają 16% CRIT Rate.

Na sands i goblet wybierz Elemental Mastery, a na circlet CRIT DMG albo CRIT Rate. Kolejność substatów w podanym buildzie to CRIT DMG, CRIT Rate, Elemental Mastery i Energy Recharge. Pasywka Mityi zwiększa Base Stellar-Conduct DMG drużyny zależnie od jego Elemental Mastery, maksymalnie o 14%.

Pierwszy wybór broni to Starsealed Edict. Podane efekty dają 24% CRIT DMG i Elemental Mastery po użyciu Skill, a reakcje pobliskiej drużyny zapewniają kolejne Elemental Mastery. Reliquary of Truth daje 8% CRIT Rate oraz 80 Elemental Mastery po Skill. Czterogwiazdkowa broń Winter's Heavy Heart daje Elemental Mastery za postacie Cryo i ATK za postacie Electro w drużynie. Rozważ też broń Dawning Frost, która daje Elemental Mastery po trafieniach Charged Attack i Skill.

Co rozwijać najpierw

Proponuję rozwijać najpierw Principle: Variable Detection, potem Chain Reaction (NA), a na końcu Analysis: Gradient Theory. Core jest potrzebny do obu stanów zestawu, a talent ataku obejmuje Charged Attack. Burst zadaje obrażenia obszarowe i tworzy trzy Beacony. Podane dane nie mówią, jak poziomy talentów zmieniają obrażenia reakcji, więc potraktuj tę kolejność jako sugestię.

Do maksymalnego awansu zbierz 420 000 Mora, 168 sztuk Kristallfold i 46 sztuk Shattered Stability Anchor. Potrzebujesz też jednego Vajrada Amethyst Sliver, dziewięciu Vajrada Amethyst Fragment, dziewięciu Vajrada Amethyst Chunk i sześciu Vajrada Amethyst Gemstone. Do tego dochodzi 18 Chimeric Core, 30 Symbiotic Chimeric Nucleus oraz 36 Prime Chimeric Nexus.

Na wszystkie talenty potrzebujesz łącznie 4 957 500 Mora i trzech Crown of Insight. Zbierz dziewięć Teachings of Charity, 63 Guide to Charity i 114 Philosophies of Charity. Potrzebne są też 18 Chimeric Core, 66 Symbiotic Chimeric Nucleus, 93 Prime Chimeric Nexus oraz 18 Mask of the Virtuous Doctor.

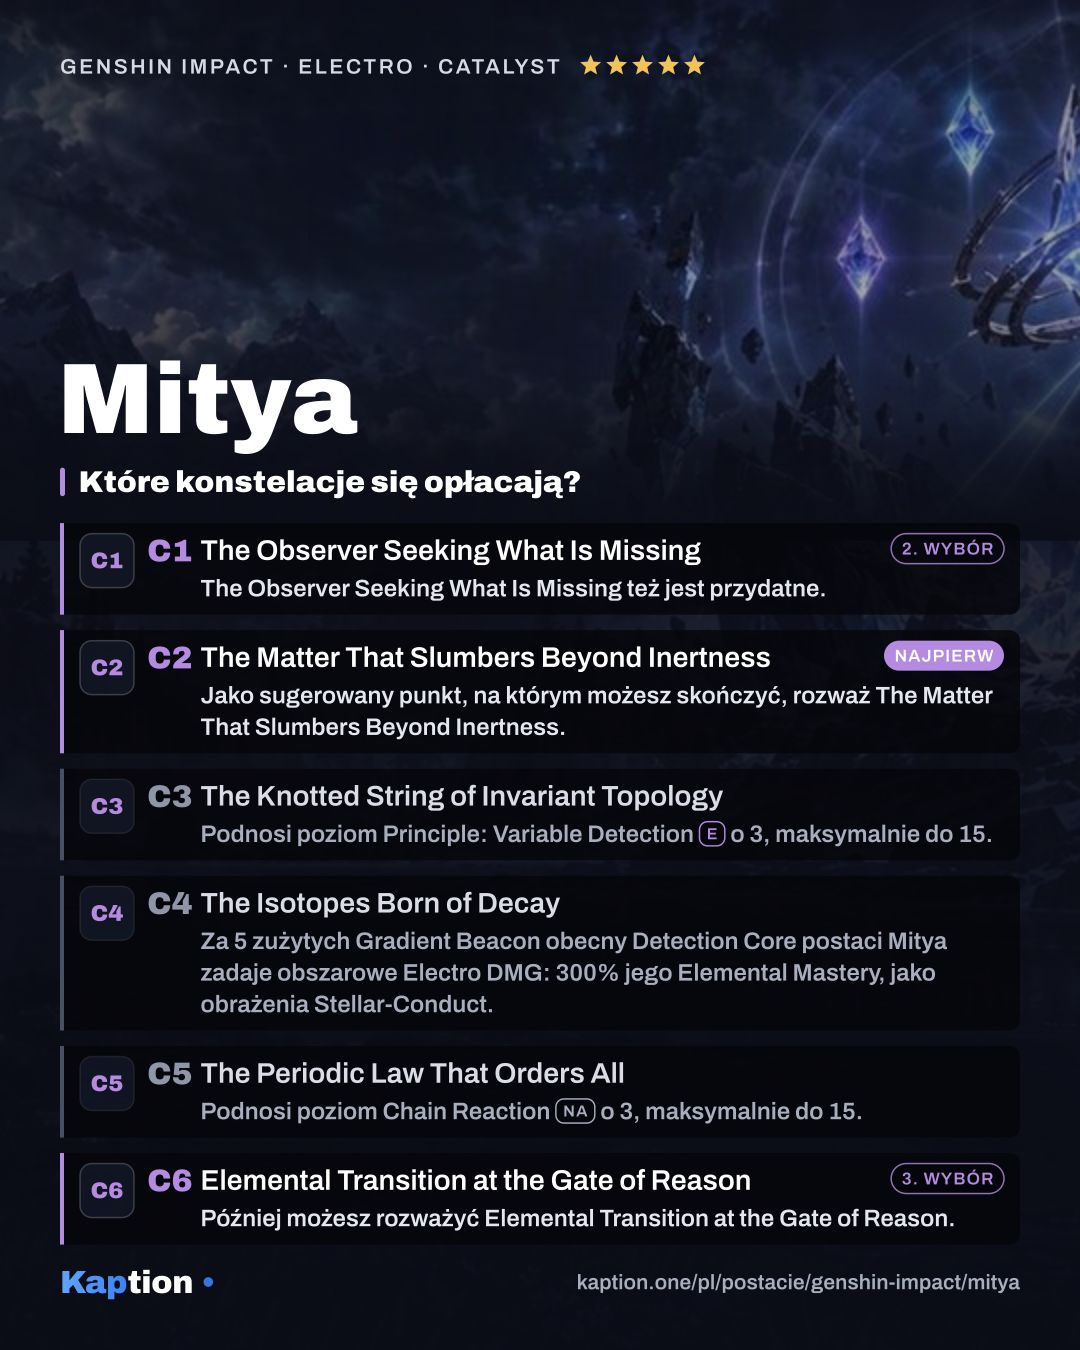
Które konstelacje się opłacają

Jako sugerowany punkt, na którym możesz skończyć, rozważ The Matter That Slumbers Beyond Inertness. Gdy Core jest obecny, przeciwnicy w Polestar Field tracą 20% Cryo RES i Electro RES. Steady State daje pobliskiej drużynie 123 Elemental Mastery, a Overloaded daje aktywnej postaci 234.

The Observer Seeking What Is Missing też jest przydatne. Zwiększa limit przenoszonych przez Mityę Beaconów do pięciu, sprawia, że Skill tworzy Beacon, i daje aktywnej postaci 40% CRIT DMG, gdy Core jest obecny. Stworzenie Beacona przywraca Mityi 10 Energy, raz na 8 sekund.

Później możesz rozważyć Elemental Transition at the Gate of Reason. Wzmacnia Core w obu stanach i podnosi przez efekt Elevate obrażenia Stellar-Conduct pobliskiej drużyny o 20%. The Knotted String of Invariant Topology i The Periodic Law That Orders All dają tylko poziomy talentów, więc możesz zostawić je na później. The Isotopes Born of Decay dodaje trafienie Core za każde pięć Beaconów zużytych, gdy jest on na polu, ale też jest opcjonalne.

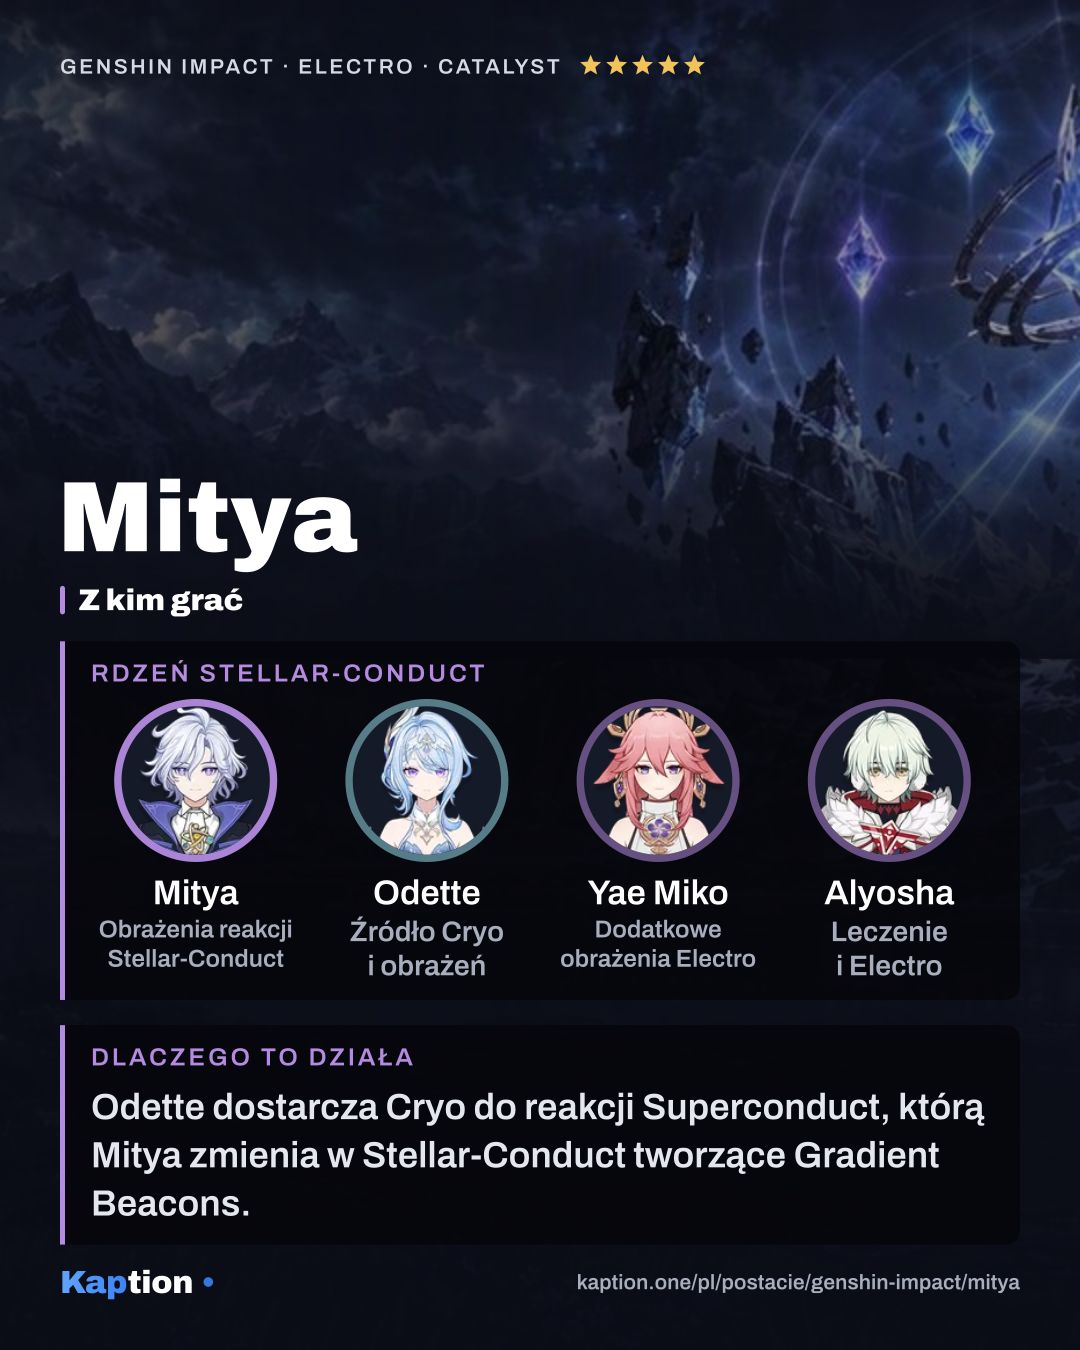
Z kim grać

Mitya zwiększa drużynowe Base Stellar-Conduct DMG zależnie od swojego Elemental Mastery. Steady State daje drużynie Elemental Mastery za jego aktualne Beacony. Overloaded pomaga za to tworzyć kolejne po reakcjach. Wybierz stan zależnie od tego, czy chcesz wzmocnić drużynę, czy użyć jego specjalnego Charged Attack.

Częste błędy

Nie przytrzymuj Charged Attack z myślą o Gradient Detonation, jeśli na polu nie ma własnego Detection Core Mityi w stanie Overloaded albo Mitya nie ma ani jednego Gradient Beacon. W Steady State dostajesz za to drużynowe Elemental Mastery. Zmień stan Core, gdy chcesz użyć specjalnego ataku.

Nie zostawiaj Beaconów bez wykorzystania na zbyt długo. Z pasywką Explosive Reagent: Safe Limits Exceeded trwają 10 sekund, więc twórz je i zużywaj, gdy Core jest gotowy. Analysis: Gradient Theory tworzy trzy, a reakcje Stellar-Conduct pomagają zdobywać następne.

Nie oceniaj CRIT Rate wyłącznie po artefaktach. Tworzenie Beaconów może dać Mityi do 20% CRIT Rate, a zestaw Disenchantment in Deep Shadow ma własne warunkowe 16% dla ataków przeciw przeciwnikom pod wpływem odpowiedniej reakcji. Zanim dołożysz CRIT Rate, sprawdź, czy te warunki są aktywne.
Najczęstsze pytania

Mitya – jaki build wybrać?

Artefakty: Tenacity of the Millelith albo Disenchantment in Deep Shadow ×4. Główne statystyki: Sands: Elemental Mastery, Goblet: Elemental Mastery, Circlet: CRIT DMG albo CRIT Rate. Tak podpowiada gra. Polecana broń: Starsealed Edict, Reliquary of Truth albo Winter's Heavy Heart.

Mitya – co rozwijać najpierw?

Najpierw Principle: Variable DetectionE, potem Chain ReactionAtak i Analysis: Gradient TheoryQ.

Mitya – które konstelacje warto zdobyć?

Najwięcej dają: C2 The Matter That Slumbers Beyond Inertness, C1 The Observer Seeking What Is Missing i C6 Elemental Transition at the Gate of Reason.

Mitya – z kim grać?

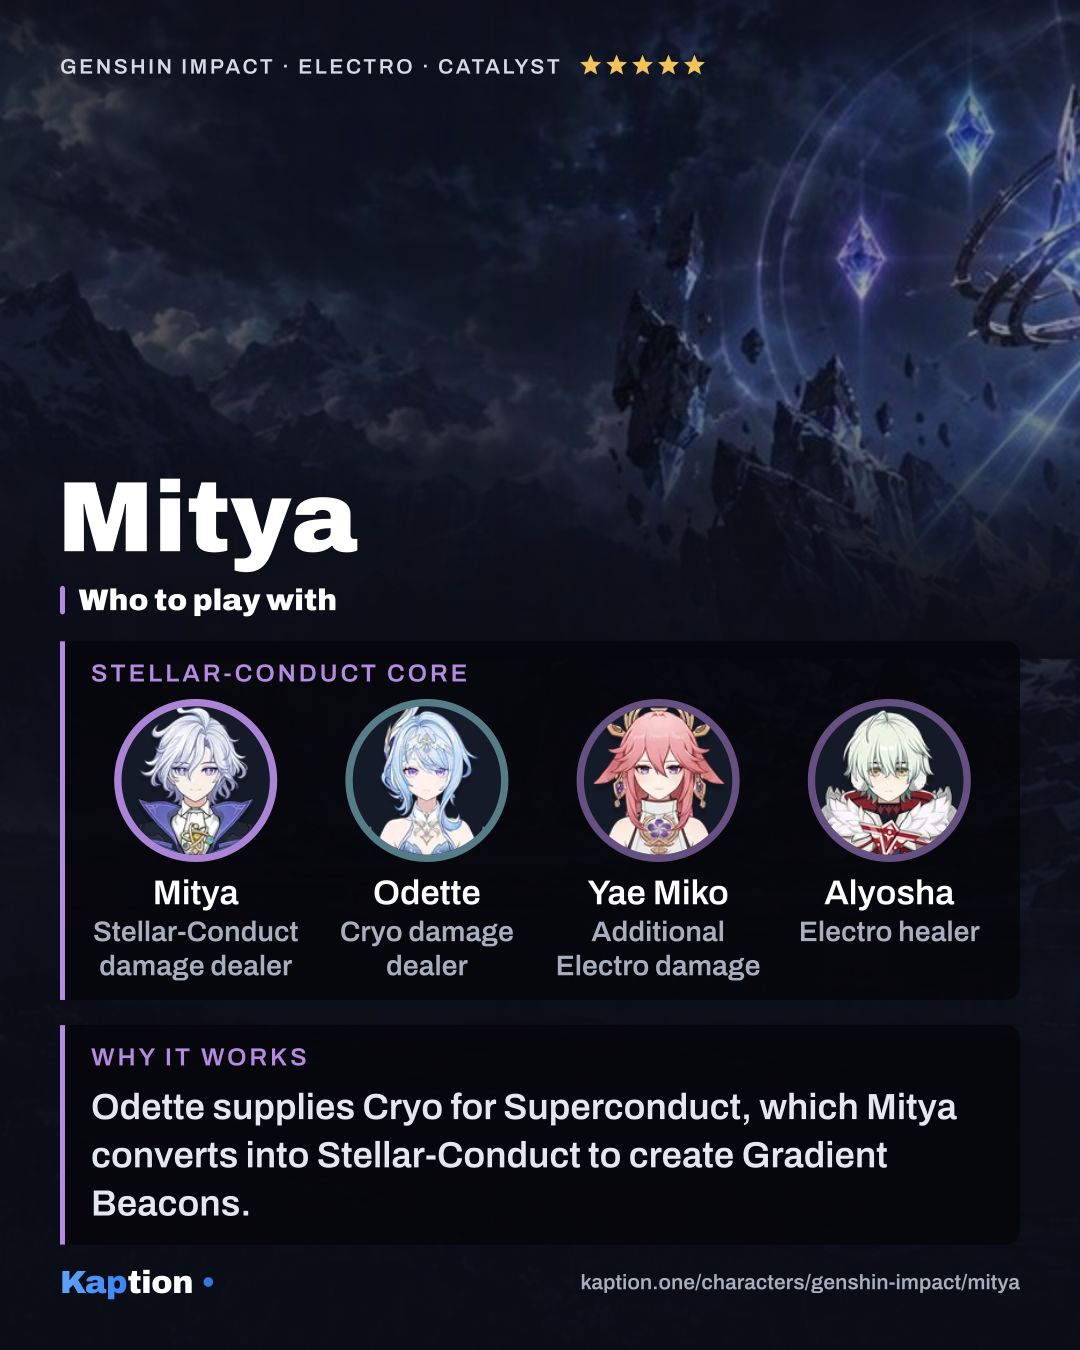
Dobrze gra się z: Odette, Yae Miko i Alyosha.

Czy Mitya jest po polsku w Genshin Impact?

Sama gra nie ma polskiej wersji językowej. Kaption pokazuje polskie napisy do dialogów na ekranie gry, więc kwestie postaci Mitya przeczytasz po polsku. Nazwy umiejętności i przedmiotów zostają po angielsku, tak jak w grze.

Udostępnij

Gotowe karty do wrzucenia na Instagram, TikToka, X albo Discorda, po polsku albo po angielsku.

4:5 na Instagram i Facebooka · 9:16 na Stories, TikToka i Shorts · 16:9 na X i Discorda

Karty buildów i poradniki w pigułce wszystkich postaci Genshin Impact (131) w jednym ZIP-ie: 4:5 (46 MB) 9:16 (61 MB) 16:9 (31 MB)

Na Discordzie wklej skopiowany link albo przeciągnij pobrany plik do czatu.

Dane gry w wersji 7.2.0.

← Wszystkie postacie z Genshin Impact